
Diary
15/11/2018
Today I opened up all of the survey results in a spreadsheet and went through and analyzed the results. It took me quite a while as I had over 170 responses and therefore needed to make sure the results that I talked about were representative of all of the results. I used the premade Google Forms graphs for the quantitative answers and listed the main points from the qualitative questions. Now I need to analyze three clips from Edgar Wright movies to talk about in my video essay.
Inform our own idea...
The people who watch all of these shows I have looked at are all different age groups. Ant & Dec's Saturday Night Takeaway is one of the shows with the broadest range of people watching, the reason this show is like this because of Ant & Dec and also the show has a big range of content.
The findings suggest that if we go with the Saturday evening, ITV, 7 pm as this is one of the most popular times for viewing TV as a family. At this time people will put the TV on and just watch whatever show is on. For the group, this shows us that we need to make sure that our show doesn't collide with a popular show as everyone would just watch the show. If we did have to show our show at the same time as a popular show we would have to make sure we were appealing to a different target audience.
Based on our idea we now need to research our target audience to find out what they would want from a show, we need to think of ways we can make our show different from others. We need to research what the shows we want to borrow ideas from do and how they are really successful.
SHOT TYPES, ANGLES & MOVEMENTS
Shot types, angles and movements worksheet
Analysing The Grand Tour
00:00-00:04: The shot is a wide aerial shot possibly used as an establishing shot to show the audience the surroundings. In the shot, the car drives past very quickly and the clip is very short which shows the speed of the car. This creates an idyllic scene for viewers who have a love for cars.
00:04-00:06: This next shot which is a long shot follows the car with a pan as the car accelerates off quickly. This shows the viewer the quick acceleration of the car, grabbing the attention of them and evokes excitement.
00:06-00:08: The following shot which is a wide shot shows the car moving around the corner and the camera is on the same side showing the car is moving quickly. As this clip is so short it covers the viewer in goose bumps and the car engine accelerates.
00:08-00:09: This shot is an extreme close up which is very shaky but conveys to the viewers how fast the car is. This extreme close up gives the viewer an up close and personal perspective making them engaged in the action.
00:09-00:10: This shot is a wide shot and the camera pans as the car gets closer. The shot shows the car travelling towards the camera at great speed and it makes the viewer enthusiastic about what the car has to offer.
00:10-00:11: Medium shot through the woods of the car. This allows the viewer to see the car in different scenarios and feel like they want it even more.
00:11-00:13: Long shot shows distance the car is covering and makes the viewer feel eager to see the car more and fine out more information about the car.
00:13-00:14: Aerial shot, the car moves from bottom of the frame to the top. This gives the viewer another perspective of the car and excites them about the possibilities of what it has to offer.
00:15-00:17: First person view shot on the front of the car. This conveys to the viewer how fast the car is and gives the viewer a first person view making them feel like they are in the action.
Learning about Aperture, ISO, Shutter Speed
Aperture: is the control of how much light a lens lets in, if a lens has a wide aperture (eg:F1.8) it gives a shallow depth of field.
ISO: is the control of the sensitivity of the shutter, the lower the iso the less sensitive it is to light creating a finer image.
Shutter Speed: is the amount of time the shutter is open for, a faster shutter speed(eg:1/400) will let in less light than a slower shutter speed(eg:1/5).

Portrait with out of focus background
Aperture: F5.6
ISO: 100
Shutter Speed: 1/200
For this photo, I took 5 pictures of Konstantin sitting on a wall. I took the chosen photo with the sun facing Konstantin so there was no silhouette.
Wide Landscape of the campus
Aperture: F20
ISO: 100
Shutter Speed: 1/50
For this I tried several locations and with different settings and decided to go with this one. I decided to crop out a bus shelter which I hadn’t seen until after the photo had been taken.


Quick movement captured precisely
Aperture: F5
ISO: 320
Shutter Speed: 1/1000
At first, I tried to get a similar picture to this along a nearby road however the cars where not going fast enough. In the end, I decided to try it with the clipboard and it worked fairly well.
Long Exposure
Aperture: F29
ISO: 100
Shutter Speed: 1/3
After finding the correct camera settings and making sure the shutter button was pressed at the right time I came up with this photo. To improve this I could try to make the sky less washed out.


Extreme Close Up
Aperture: F5.6
ISO: 100
Shutter Speed: 1/200
This photo didn’t take as long to think about as I have done some like this before. I was happy with the photo when I took it, however looking back at the photo on the computer I realised that I needed a faster shutter speed.
Lens Flare
Aperture: F36
ISO: 1600
Shutter Speed: 1/100
Before attempting to take this lens flare photo I had never attempted it before. Unfortunately, when we decided to try this photo the sun had gone in so I used Konstantin’s phone flash.


Candid
Aperture: F5.6
ISO: 100
Shutter Speed: 1/200
Conveniently Cameron was standing right there and I quickly adjusted the camera settings and took the picture.
Photoshop Tutorial

In the Photoshop tutorial, we started with the aim to have a whole image black and white apart from one object. We did this by duplicating the layer, making the top layer black and white and then using the eraser to colour in the object we wanted to see. We then did this with a mask so we could make changes after we had finished. I then used the same principle for the second picture which is a present with Donald Trump on it.

180 Degree Rule
Today we learnt what the 180-degree rule says, I learnt that it says that the cameras should stay on one side of the actors being filmed. This is done as when the cameras film from different angles it will mean the final video is disorientated. If the cameras film all the shots from one side it means the viewer will pick up an easier understanding and then focus more on what’s happening in the video. Also, if the cameras are from different sides of the actors the eye line will be wrong making it look like the actors aren’t talking to each other.
We were asked to film a video in which two people have an argument following the 180 degree rule. Quickly we decided
that we wanted to shoot in a café scene and then started working on an idea. At first, we thought about filming a video of someone pulling out the chair as someone sat down but we then decided against that idea. In the end, we decided to make our video about someone who wants to get a drink from the bar, however it is shut and she gets annoyed with someone who is sitting near by. After arriving at the café we setup all the equipment and got to work filming, we took several takes in each scene so when the video was being edited we could decide what was best to use.
I think our short film shows the 180 degree rule well as when watching the final video it is easy to watch and difficult to be confused as all the shots face the same way. It would have been easy to break the rule but carefully thinking about the shots and making sure we followed it meant that the final video isn’t confusing.
At the end of the video is a scene in which we broke the 180 degree rule, we decided to put a camera on the other side behind the two actors. This stops the video flowing as easily and doesn’t seem like it fits with the rest of the video.
Overall, our video uses the 180 degree rule correctly. To improve I need to practice using the rule in different surroundings to make sure I always get it correct.
Narrative Keywords
Linear Narrative is when the narrative follows in order starting at the beginning, followed by the middle and then the end.
Non-linear Narrative is when a story starts with something big happening at the beginning and then moves on to show the surrounding story.
Realist is when a what is said is a true representation of what actually happened or is happening.
Anti-realist is when what is shown may be adapted and not a true representation of what happened.
Enigma is when the audience is not given some information and they have to read between the lines to work it out.
Single strand narrative is when a story has one main character or hero acting in a plot, while there are several minor characters.
Multi-strand narrative is when there are two or more groups of isolated characters, the audience will then become attached to both groups and will want to know how the groups relate to each other.
Open ending is when there are no limits to what can happen at the end of the project. It is often used when there are several films which follow each other, so when the audience has finished watching the first film then can think about what will happen in the proceeding film.
Closed ending is when at the end of the film the story has been completely finished, this usually means several years is made into a short space of time.
Flashback is when a scene is shown that happened before, sometimes it is used to show a vivid image in the character's mind.
Flash forward is a scene that takes the narrative forward in time.
Script Writing - Forking it up
Today we started learning all about scripts, how they are written and the key aspects. We learnt about the conventions, 1) when a character’s name is in the scene for the first time it must be in capitals following this it should be lower case. 2) Each scene needs to begin with s slug-line which says the scene number, whether its inside(INT) or outside(EXT) and the location of that scene. 3) Scene descriptions are specific information for the actors, this needs to be done carefully as the actors should be able to add their touch. We also learnt about all the different narrative terms, what they mean and how to use them (see document above).
We were then set with the task to write a script for a short film in which a prop is used in two drastically different ways. After looking at several ideas we settled on our idea of using a fork which was originally used to eat lunch but then used as a weapon to kill another character. The first time we thought we had finished our script, we noticed it wasn’t very long so we adapted our idea to include more scenes which looking back now was a really good idea. (view the script)
We collated all our equipment and went round to all the different places and got all the shots we needed. Then I got to edit the video, at first, I did a rough cut of the video and then went over the whole video adding effects and making it look as good as it could be.
One of the strengths of my final film was the shot in the basement, I put the camera on night vision then used a phone torch to create the effect which I think works well. Another strength to my final video is how well the music compliments the video.
I think our script was very effective as it meant we had an idea of what we would do before we started to film, during filming we adapted the script as we realised some changes had to be made such as adding the chains for the last scene which we hadn't planned on doing.
To improve my final video I could add music to the start and I think this would make the viewer more engaged in watching the video.
Foley Sounds
Today we started to learn about sound in film. Firstly, we learnt about the differences between Diagetic and Non-Diagetic. I learnt diagetic is sound which comes from within the scene and non-diagetic is sound from other sources which is added in post-production. We learnt about Foley Artists and how they use ordinary objects to make sounds which are added when the film is put together.
We were then given some objects and told what sound to try and make with them. We then went to a quiet room and used the zoom to try and make the objects sound as near as possible to the sounds we were asked to make.
First, we used the leaks and snapped them in half in front of the zoom to try and make the sounds of bones cracking. I think the sound is quite realistic, however, I think it the leaks weren’t as fresh it would sound slightly more realistic. We then hit rolled up newspaper against a soft wooden stick this creates the effect of a body or face hit, this sounds okay but I think it would need a lot of perfecting to make it sound good. Next, we used crunch cornflakes with our hands to make the sound of footfall in leaves this sounds pretty realistic and works well. After that, we sprinkled metal pieces on a sheet of foil to create the sound of rain, the sound works quite well, however, if the sound could be brought down in pitch it would sound a little more realistic. We then used crunched cellophane wrap to make the sound of fire, I think this needs a little bit of perfecting to sound a little better.
After getting all the audio recordings I imported them in to Premiere Pro and added some titles. To improve this process, I could use a program like audition to edit the sounds to make them sound more realistic.
Adobe Audition - Terminator Soundtrack
Today I used Adobe Audition to create a soundtrack for a clip from Terminator. The clip I was given contained no audio and I had to create everything. Some of the audio has been created using a Zoom recorder and other clips are from freesound.org. After I finished, I checked with my tutor who showed me some improvements I could make to the soundtrack to make it fit better. I then made a few more changes and was happy with it. To make the soundtrack perfect I would need to spend a lot more time fine-tuning the sound effects. I found that splitting the sound effects up in to smaller sections allowed me to more easily set them in time with the video.
Below is a step by step guide on how to use Adobe Audition to create a sound track:
-
Find a clip of a movie that doesn’t contain any sound (here are the options I was given: http://bit.ly/2wchVMO or http://bit.ly/2wXEHaW)
-
Find your audio clips using either an audio recording device or a website like freesound.org and download them to a folder on your computer.
-
Open Adobe Audition and click multitrack at the top.
-
On the menu that appears give your project a name and choose the location of where you want all the clips saved.
-
On the left hand side mid way down click media browser.
-
Use the media browser at the side to find your film and drag it on to the first track, this will appear as a video reference allowing you to see the video as you edit the audio at the bottom. Note: when you export your project just the audio will be created and you will need a program like Adobe Premiere Pro to add the video in.
-
Using the media browser at the side navigate to the folder containing all your audio and drag it on to the track in the desired places.
-
If you need to add any effects to any pieces of sound, next to the media browser button click Effects Rack. Click next to any of the numbers and you can select an effect to add.
-
Once you are happy with the audio, go to File > Export and choose how you want to export your video.
Film Noir - 3 point lighting
Today we learnt about three-point lighting. It's when you have a key light (main light), fill light (fills the gaps) and a backlight which makes the object look more realistic. We were then set the task to go around and film in 4 scenes using 3 point-lighting to make a Film Noir.
00:00-00:06 (Scene 1) We placed two lights close to the main actor and the third light further away behind. This allowed us to create the effect of the person walking in to the shot being slightly illuminated.
00:06-00:22 (Scene 2) We placed two lights pointing at the wall from both angles to create two shadows as the actors
walked along the wall. The third light was placed from the direction the actors walked from to light the back of them.
00:22-00:47 (Scene 3) We simply used two lights for this shot as we were filming a brightly lit corridor. The two lights were just used to make the scene a little lighter.
00:47-01:05 (Scene 4) For this scene we placed two lights opposite to the actors to light them as they walked across. The light furthest away creates a shadow on the wall which looks good in black & white.
Skills
Portfolio Feedback
Green Screen
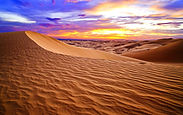


Today, we learned about how to use a green screen to change the background of a video. Firstly, we sketched out a drawing of what we wanted to create, then found the images online. I decided on this background image as it is quite a large open area so it looks more realistic and because of the colours at the top. I chose the camel because it's a .png image which meant it was super easy to add to the background. We then set up the camera lights to fit the scene. We used one light as a highlight to create a sun shining effect above me in the shot. Following this, we opened up Adobe After Effects CC 2017 and imported the footage into a new project. I then dragged the footage onto the third icon below the import panel to create a composition, right clicked the file name, clicked effect, keying, keylight (1.2). In the new panel that appears I clicked the eyedropper tool to select the green background which then removed it. After this, I moved the other clips around in the timeline to create a scene I was somewhat happy with. I used the transform tool to make the camel move around the scene.
When comparing my video to those who are made professionally mine is nowhere near as good because of the time limit I had and I had limited past experience. If I had spent more time to create a better idea with better graphics for the foreground and background it would look a lot better.
As you can see from the example at the side which shows clips in films with what they looked like while filming and what they look like after the green screen effects have been added in post-production. They use a lot of professional equipment to ensure that the shots look perfect and the audience can't see any of the green screens. The production values for the sets in the video are huge which allows them to spend money on special effects.
Animation
Radio Advert
We started off today's lesson by watching a few radio adverts. I decided to make my radio advert for Febreze because we are currently making a viral advert which means I know quite a lot about them already. I started off by creating a script using Google Drives's scriptwriting extension, I spent quite a while doing this because I wanted to make sure I would be happy with the final product, I came up with a lot of sound effects because I think they are paramount for a radio advert. After this Elise went through the script a couple times reading it to the Zoom. I then went and created a multitrack in Audition and I inserted all the sound effects. I used effects such as fades to make the whole edit sound a lot better. Then I exported it then put it into Premiere Pro and overlayed my pack shots from last week. Doing this showed me that it can be a lot of work to make a radio advert be really good. To improve my work I could have gone into more detail on the script which would allow me to have spent less time trying to work things out in editing.
Pack Shots
Today we were given a bottle of Febreze and some instructions to make a pack shot, but the main creative idea was left down to us. Konstantin and I worked together on this one. We took video in front of the greenscreen and then used the same green screen principles in editing to change the background and move the objects around.
Advertising
Today we used the same 3 point lighting system we learnt about a couple weeks ago to light a green screen to do the same this time but to promote a product. Once we set up all the equipment I got Callum to model the product. This didn't take that long to film and was pretty simple. After we finished filming I put the video in Adobe After Effects which allowed me to change the background and elements such as text and pictures of the battery packs. The way the battery packs move across the screen at the end doesn't look the best but it was the first time I had done something like this.
2.5D Parallax
Today we followed a tutorial to create a 2.5D Parallax. I decided to use a picture of some stars with trees in front and move the trees separate to the background. The tutorial was quite complicated but as I followed it carefully it worked quite well. We selected the trees and put them on a sperate layer and then used photoshop to animate them. I then added it to Premiere Pro, a voiceover and some music. I then exported it. If I was going to do this again I would maybe use an image with a more definitive object which would make the final edit a lot cleaner. I would also work with the audio to make it flow and feel better when played along side the video.